Dual PCMCIA Reader
@EFDA.ADF
76H2738
Note: If your PCMCIA Reader suddenly
refuses to read / write, and you have been pulling it out / reinserting
it a bit, one of the SMD capacitors (white ceramic caps) might have had
a solder joint fail. Check the solder joints carefully, look for a "fracture".
I resoldered one, and restored my reader to life...
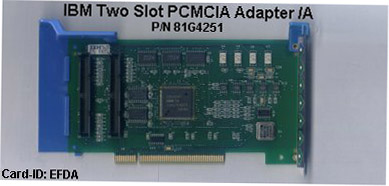
J1 and J2 are HPDB68 pin connectors,
identical to those used on Fast/Wide drives. The cable is 68 pin .025 pitch.
My Reader has a slightly different chip layout, but the SMD capacitors,
the oscillator, controller, and the J1 / J2 connectors are in the same
place.
If you are using OS/2 version 3, install the ThinkPad 720 PCMCIA drivers...
The PS/2 E is an ISA machine... Duh!
PlayAtWill
Win 3.1x and Dos utility to install Windows PCMCIA support
IBM
PCMCIA Adapter/A Option disk v1.0Dos PCMCIA
drivers. Will NOT work under OS/2.
Posted by Landon
Sheely
I purchased one of these a while ago for a project
I was working on and had it installed in my 8595. It did, indeed,
work great under DOS/Win and OS/2 Warp. Problem is that the adaptor
uses the "stinger" chipset which is the same as what IBM used in the ThinkPad
720 series. This chipset is
unsupported in Win9x and, if memory serves, you
can only use the real mode drivers and not have any 32-bit support.
Tis a bummer.
Editor's Note:
NT 4.0 will not even SEE it.
Two Slot PCMCIA Adapter for MCA Part Numbers
------------------------------------------------------------------------
OPT P/N O2MCPCM - MFG P/N 76H2738 for MCA-systems
OPT P/N 82G7092 PS/2 Bezel kit
FRU P/N 81G4261 PCMCIA Adapter for MC
FRU P/N 81G4633 PCMCIA Bay
FRU P/N 81G4634 PCMCIA Cable
------------------------------------------------------------------------
Operating System requirements
The drivers supplied
with this adapter support DOS 5.0 and higher, Windows 3.1 and OS/2 2.1
Product Description
The Two-Slot PCMCIA
MCA adapter is intended for use in desktop and tower personal computers
to provide an interface to PCMCIA cards in those machines. The adapter
supports the R2.1 PCMCIA specifications.
HW - Installation (Adapter and Bay Assembly)
1.
Mark the cables as J1 and J2
2.
Plug the cable marked J1 into J1 connector on the logic card
3.
Plug the cable marked J2 into J2 connector on the logic card
4.
Power-off the computer and unplug the power cord
5.
Remove the cover (Computer)
6.
Plug the logic card into a 16-bit slot
7.
Mount the bay card assembly into the external DASD bay
8.
Plug the cable marked J1 into J1 connector on the bay card
9.
Plug the cable marked J2 into J2 connector on the bay card
10.Verify
that cables will not interfere with re-installation of cover.
Re-route the cables if there will be interference.
11.Re-install
the cover (Computer)
12.Plug
power cords back in the outlets and power-on the computer
Software Installation.
Copy the
files from the enclosed Micro Channel Options diskette onto the back-up
copy of your system reference diskette. Start Update the System Configuration
For All Systems
Having successfully
installed this option into the computer, you are now ready to plug PCMCIA
cards into it. This adapter allows the hot plugging and removal of PCMCIA
cards. Depending on the PCMCIA card that is used, you may be required to
install the drivers which were supplied with that card.
Installing the Adapter Device Driver
DOS Driver Installation
1.
Install DOS (Disable the PCMCIA drivers, if these have been included in
the version of DOS)
2.
Insert Option Disk in A:, type A:\UINSTALL and press ENTER
3.
Select INSTALL DOS PCMCIA DEVICE DRIVERS for IBM Machines
4.
Follow the installation instructions shown on the display
5.
Select Option 17: Any with INTEL PCIC
Restart the system
The Option Driver will install two logical drives (i.e. D and E) for PCMCIA
memory cards under DOS. Use the utility EZPLAY.EXE to obtain the PCMCIA
cards information (card information structure- CIS) by typing EZPLAY and
pressing enter. Some PCMCIA cards such as the PCMIA IR cards need to be
enabled by its software first in order to display CIS.
Windows 3.1 Driver Installation (includes DOS
installation)
1.
Start Windows (Enhanced Mode)
2.
Select FILE from the Program Manager Window
3.
Select RUN from the pull-down menu
4.
Insert Option Disk in A:, type A:\PCMINSTW and press ENTER
5.
Select Select any with INTEL PCIC
6.
Follow the installation instructions shown on the display
7.
Restart system The Option Driver will install two logical drives (i.e.
D and E) for PCMCIA memory cards under DOS and Windows. Click on the icon
PlayAtWill to obtain PCMCIA card information (card information structure-
CIS)
8.
The utility DICRMU01.SYS may cause some configuration to run slowly. If
slow operation occurs, please edit the CONFIG.SYS file by selecting the
file editor and insert REM at the beginning of the line DEVICE=C:\EZPLAY\DICRMU01.SYS
OS/2 2.1 Driver Installation
1.
Start OS/2
2.
Start Full Screen OS/2
3.
Insert Option Disk in A:, type A:\PCMINST2 and press ENTER
4.
Select Select any with INTEL PCIC
5.
Follow the installation instructions shown on the display
6.
Shutdown and Restart the system
7.
Click on PlayAtWill icon to obtain PCMCIA card information (card information
structure- CIS)
Personal Experience- To install the dual slot
adapter under OS/2 v.3, go to OS/2 System, System Setup, Selective Install,
click on the button to the left of PCMCIA Support, choose the IBM ThinkPad
720.
Preparing this Adapter for Use
Having successfully
installed this option into the computer, you are now ready to plug PCMCIA
cards into it. This adapter allows the HOT PLUGGING and REMOVAL of PCMCIA
cards Depending on the PCMCIA card that you choose to use, you may be required
to install the drivers which were supplied with that card.
Troubleshooting the Installation
The adapter does
not operate
1.
Confirm logic card is installed correctly in computer's 16-Bit slot.
2.
Confirm bay card is installed correctly in a 3.5 or 5.25 Inch bay.
3.
Confirm that the device drivers and support software have been installed
and are operational. You will see a response from these drivers during
the power on or re-booting sequence.
A PCMCIA card does
not operate in a slot
1.
Make sure that the card is completely inserted in the slot. There will
be an audible beep when the card is properly inserted or removed.
2.
Make sure that the device drivers for the PCMCIA card have been installed
in this computer.
A PCMCIA card does
not operate in either port
1.
Confirm cables are plugged according to instructions.
2.
Confirm bay card is installed in 3.5 or 5.25 Inch bay
An error message
Invalid Drive Letter appears.
This may occur
if the host computer has assigned drive letters above C: for devices such
as a CD ROM, additional hard disk or partitioned hard drives.
Insert the following
statement in the CONFIG.SYS before any device driver statements: lastdrive
= # where # equals the letter of the last drive in the system. You must
include two letters for the adapter and letters for all of the previously
configured drives.
DOS Configuration
Example
DEVICE=C:\WINDOWS\HIMEM.SYS
FILES=30
BUFFERS=30
DOS=HIGH,umb
SHELL=C:\DOS\COMMAND.COM
/P /E:512
LASTDRIVE=M
STACKS=9,258
DEVICE=C:\DOS\SETVER.EXE
DEVICE=C:\DOS\SMARTDRV.SYS
DEVICE=C:\DOS\EMM386.EXE
NOEMS X=C800-C9FF
DEVICE=C:\EZPLAY\SSDOSAT.SYS
/O
DEVICE=C:\EZPLAY\IBMDOSCS.SYS
DEVICE=C:\EZPLAY\RMUDOSAT.SYS
/MA=C800-C9FF
DEVICE=C:\EZPLAY\AUTODRV.SYS
C:\EZPLAY\AUTODRV.INI
DEVICE=C:\EZPLAY\DISKDRV.SYS
The CONFIG.SYS File
DOS CONFIG.SYS
The installation program modifies the DOS CONFIG.SYS
file to include the appropriate DEVICE statements in the following order.
DEVICE=x The letter x
specifies the Socket Services already installed on the computer.
DEVICE=y The letter
x specifies the Socket Services already installed on the computer.
DEVICE=[drive:][path] PCMATADD.SYS
/baseslot=n /stbtime=n
where:
[drive:][path] The parameters [drive:][path]
specify the location of the device driver file.
/baseslot=n This
option sets the base slot address, where n specifies whether the address
begins at (0) or (1). The default is 1. Set this switch to 0 only
if you have a problem addressing the slots. If a value other than 0 or
1 is specified, this switch is ignored and the default setting is restored.
/stbtime=n
This option enables the standby mode, where n specifies the number of minutes
that will elapse before the card goes to standby mode. The minimum value
is 5 minutes, the maximum is 20 minutes. If a value greater than
20 is specified, this switch is ignored. All sockets are effected when
you set this switch. (This feature does not support solid state cards.)
OS/2 CONFIG.SYS file sequence
The installation program places the appropriate device statements in
the OS/2 CONFIG.SYS file. They MUST appear in the following order.
BASEDEV=OS2DASD.DMD
DEVICE=C:\OS2\xxxxxx.SYS
(the Card Services statement)
DEVICE=C:\OS2\PCMATAE.SYS
DEVICE=C:\OS2\xxxxxxxx.SYS (the Socket
Services statement)
BASEDEV=PCM2ATA.ADD
BASEDEV=OS2PCARD.DMD (Note... Card and Socket Services
are not supplied with this option)
switch options for the main
device driver
BASEDEV=PCM2ATA.ADD [/s:n] [/i:m] [/stbtime:n] [/b] where:
/s:n This option
recognizes the PCMCIA sockets, where n specifies the number of physical
PCMCIA sockets available. The default is 2 sockets, the maximum is 4 sockets.
/i:m This option
ignores specific PCMCIA sockets, where m specifies the logical socket number
to be ignored. Multiple settings are allowed. This feature is useful when
a Type III card physically occupies two sockets.
Examples:
BASEDEV=PCM2ATA.ADD /i:1 (First socket is ignored)
BASEDEV=PCM2ATA.ADD /s:4 /i:2 /i:3 (Second and third sockets are
ignored)
/stbtime:n This option enables the standby mode.
(Same as described above for DOS stbtime option)
/b
This option specifies the OS/2 operating system to start (boot) from
the PCMCIA-ATA card. If you specify this option, then PCMCIA.ADD module
decreases the number of sockets specified by the /s switch because
the startup PCMCIA-ATA card is treated as an internal IDE hard disk,
not a PCMCIA-ATA card. When the OS/2 operating system starts (boots) from
the PCMCIA-ATA card, if you use the /s:4 option w/o the /b option, the
disk assigned to the last drive-letter will not be assigned to any physical
socket. (To make this PC Card a bootable PC Card, see the documentation
that came with the OS/2 operating system.)
Notes About the /b Option
1. Do not ignore the computer startup socket by the /i
option when you use the /b option. Because the PCM2ATA.ADD module
cannot examine whether or not the socket can start the operating
system, the PCM2ATA.ADD module decreases the number of supported sockets
by the /b option and subtracts the number of sockets to be ignored.
For example, when you add the /s:4 /b /i:2 options to the PCM2ATA.ADD
module, and the OS/2 operating system is started from socket 2, the
PCM2ATA.ADD module can manage only two sockets. Sockets 1 and 3 are assigned
and socket 4 is ignored.
2. This switch option applies only to the CONFIG.SYS file
residing on the PC Card. Do not specify this option on the CONFIG.SYS
file that resides on the internal hard disk drive.
3. If you started (booted) from the PC Card, do not remove
the card until you shut down the operating system.
9595 Main
Page
|