|
RAID Bays
Under construction. There is information from a number of places. Editing
HAS NOT been completed...
Removing Microswitch Panel from 3 Bay Cage
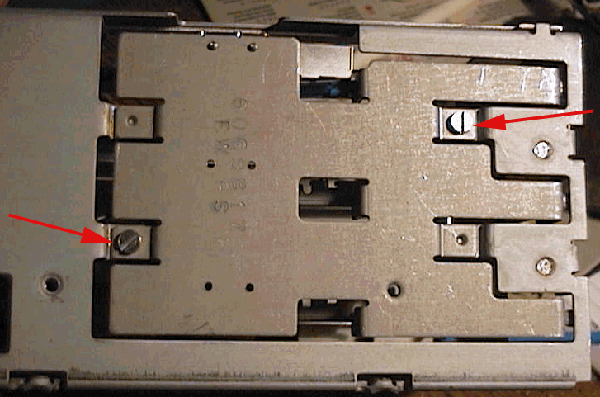
First, take off the left rail. Then, unscrew the two screws marked
with the red arrows.
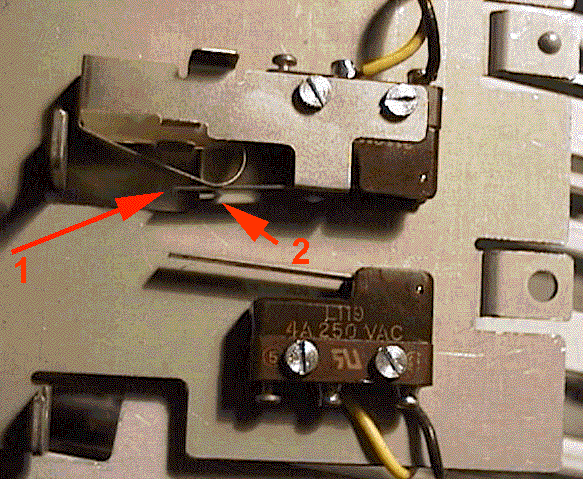
Arrow #1 points to the proper assembly of the guide and the switch lever.
The curved spring pushes down against the microswitch's lever.
Arrow #2 points to the support that limits the lever's downward
travel.
The printing on the switch is L119, 4A 250 VAC.
It makes it easier reattatching the switch if you start the screw
by the black wire first. That spring steel part that wraps around the switch
wants to open up. (the bottom switch is mounted reversed and without a
whatever the hell that thing is...
Parts of note-
The bay mounting rails are PN 61G3839
The plate that the microswitches are attached to is 60G9814
The blue rod is 42G0033
The bay itself is 42G0026
Jumpers on Hot Swap Drives
Some fixed disk options for the 9595 RAID system, were
shipped with the SCSI bus termination, address, and auto-start jumpers
still installed on the drive. When added to a system, the option should
not have these jumpers installed (enabled).
The excess terminators will cause signal degradation
and may result in highly intermittent and difficult to diagnose system
configuration errors or operating system failures.
The 9595A RAID ARRAY system is manufactured with
a 3 fixed disk configuration. A total of 4 additional fixed disk options
may be installed. No address or termination jumpers should be installed
on any of the additional option fixed disks. These options will be automatically
addressed and correctly terminated by the "hot plug rack" which is part
of the basic 9595A RAID ARRAY system.
The auto-start jumper should not be installed because
it allows the drive motor to spin-up immediately with system power-on.
The jumper allows a choice of either the motor starting immediately with
system power-on, or to be sequence started one at a time by POST. The total
starting surge current of all the fixed disks starting simultaneously may
cause the system power supply to "self-protect"* by shutting down.
Note: The 9595A power supply, and
other PS/2 system power supplies are designed to "self-protect" if
current surges beyond certain limits are exceeded. As options are added,
the power supply may be unable to provide sufficient starting surge current
for all drives during initial power-on. In this case, the power supply
"self-protect" will activate, resulting in the system shut down. This may
be corrected by removing the Auto-Start jumper from all the option drives.
The "self- protect" action by the power supply will not cause damage.
Hot-swap fixed disk drive replacement
The IBM SCSI and RAID adapters have been designed to allow hard
disk drives in hot-swap bays to be removed or installed while the system
is running. In some situations, hard disks may be powered down by
a RAID Adapter prior to their removal from a hot-swap bay (e.g. failed
disk drive); however, this is not a fundamental requirement prior
to removing a drive. Only persons trained and knowledgeable in RAID Array
service procedures should attempt to service this type system, due to the
exposure to possible customer data loss.
When removing drives which are still running, extra care needs
to be taken. The following facts should be understood:
1. The drive needs to be part of a FAULT TOLERANT
RAID 5 or RAID 1 Array or the operating system may be unable to access
data after the disk drive has been removed.
2. Only RAID 1 or RAID 5 Arrays allow dynamic rebuilding
on a drive that has been replaced.
3. Only one disk drive can be rebuilt at a time.
4. The current level of RAID Administration Utility
for the specific operating system should be run during disk drive removal.
The RAID Adapter marks the drive DDD in this Utility to indicate a command
was issued to the drive with no response.
5. Once a drive's status appears as DDD, a
replacement drive can be inserted into the bay. An operator can force a
drive which has already been removed from a hot-swap drive bay to be marked
DDD by invoking the Drive Information option in the RAID Administration
utility. This option is available in all operating systems.
6. Fixed disk drives are fragile. Care should
be taken to avoid rough handling of these devices. Care should also be
used when plugging and unplugging hot swap drives to prevent damaging connectors,
etc. Use ESD procedures.
When not installed in a system unit, drives
must be protected by being packed in an antistatic bag and option/FRU pack
or equivalent. When drives are being handled outside of their packaging
the must not be subjected to a shock greater than the equivalent of being
dropped 1 inch onto a hard surface. Any shock greater than this level may
damage the disks within the fixed disk assembly and could also result in
motor bearing damage which may result in noisy operation.
7. When power is removed from a hot swap drive
by the RAID Controller or by user action, the drive will immediately
park the heads, lock the actuator in the "landing zone", and begin spinning
down. However, the disk spin-down may require up to 20 seconds after power
removal. Moving the drive during spin-down should be AVOIDED.
In the event a drive is to be removed
from or inserted into a hot-swap bay, the following procedures should be
followed.
Steps for Removal of Hot-Swap Drives:
1. If drive is being used in a hotplug application
in a 9595A system and is being removed for any reason, it must not be pulled
out of the hotplug bay immediately after opening the blue retaining latch.
Power will still be applied to the drive and the drive media will still
be spinning up until the point when the retaining latch is opened. To avoid
possible media damage, allow 10 seconds between opening the retaining
latch and removing the drive
2. If the drive is being used in an 8641 / Server
500 system, power to the drive motor will be removed automatically in the
event of a drive becoming DEFUNCT and the drive may, therefore, be
removed immediately. If the drive is being used in an 8641 / Server 500
system and there is a need to remove a drive which is NOT shown as DEFUNCT
while the system is operating, the following method should be used :
- Unlatch hotplug drive and gently
pull drive forwards until it can be felt disconnecting from connector on
hotplug backplane (Approx. 10mm, or 1/4 inch, of movement).
- Allow 10 secs for motor spindown.
- Pull drive completely out of hotplug
bay.
1. Unlatch the drive and gently unseat the
drive from the backplane, but do not remove the drive completely from the
hot-swap bay.
2. Wait 20 seconds to allow the disk drive
to spin-down completely before removing it from the hot-swap bay.
3. Carefully remove the drive from the hot-swap
bay.
Steps for Insertion of Hot-Swap Drives:
1. Ensure the current RAID Administration
Utility is running for the specific operating system.
2. Verify the hot-swap bay where the drive
is being inserted appears as DDD in the RAID Administration Utility.
3. Carefully insert the drive into this hot-swap
bay.
4. Gently seat the drive completely in the
backplane connector and latch the drive into the bay.
5. Follow the directions that came with the
system documentation or RAID Adapter to activate the new disk drive and/or
begin a data rebuild operation.
On IBM systems, where a Hot-Spare drive is available, the data
rebuild operation will begin automatically without the requirement to replace
the failed drive. In cases where a Hot-Spare drive is not available, the
user or system administrator must use the RAID Administration Utility to
initiate the drive rebuild operation.
As stated earlier, this procedure may differ from implementation
by other vendors. Some other vendors' systems may rebuild data automatically
when a new drive is inserted. Our procedure requires the user to request
the data be rebuilt through the RAID Adapter Utilities in the case where
a hot spare drive is not available. This provides the flexibility to reuse
the remaining drives as part of another array without performing a rebuild
operation, or to start and monitor the rebuild operation when it is convenient
for the customer. If automatic unattended rebuild support is desired, then
a Hot-Spare drive should be defined.
Note 1:
It is recommended that RAID system users periodically
perform an "Array Synchronization" (perhaps twice a month) in order to
help prevent future rebuild failures. This can be done either via the standalone
RAID Adapter Support Diskette in an off-line mode, or while the server
is running via the Netfinity RAID services menu.
Note 2:
In situations where RAID hot-swap "demonstrations"
are being conducted, it is important that Drive Synchronization be done
prior to forcing a drive "dead" via a "hot-pull" of a working drive.
The drive that was pulled "hot" must then
be either replaced into the array and completely rebuilt, or it must
be configured into another array and synchronized prior to being used to
store data. This is because the act of "hot-pulling" a disk could result
in a partially written sector which would then need to be re-written to
correct the ECC bytes or else that partially written sector could cause
a rebuild failure later, if used in another array that was not completely
synchronized.
RAID Main
Page
9595 Main
Page
|